Archive for February, 2019

Getting started with mojo3d: Something to see!

Tuesday, February 19th, 2019

Following on from the first part of this tutorial, where we created an empty scene (with nothing of interest to look at), we’ll now add a simple cube.


#Import "<std>"
#Import "<mojo>"
#Import "<mojo3d>"

Using std..
Using mojo..
Using mojo3d..

Class MyGame Extends Window
	
	Field scene:Scene
	Field camera:Camera
	
	Field cube:Model
	
	Method New  (title:String = "My Game", width:Int = 640, height:Int = 480, flags:WindowFlags = WindowFlags.Resizable)
		Super.New (title, width, height, flags)
	End
	
	Method OnCreateWindow () Override
		
		scene						= New Scene
		camera						= New Camera (Self)
		
		Local cube_box:Boxf			= New Boxf (-0.5, -0.5, -0.5, 0.5, 0.5, 0.5)
		Local cube_mat:PbrMaterial	= New PbrMaterial (Color.White)
		
		cube						= Model.CreateBox (cube_box, 1, 1, 1, cube_mat)
	
	End
	
	Method OnRender (canvas:Canvas) Override

		If Keyboard.KeyHit (Key.Escape) Then App.Terminate ()
		
		RequestRender ()
		
		scene.Update ()
		camera.Render (canvas)
		
	End
	
End

Function Main ()

	New AppInstance
	New MyGame
	
	App.Run ()
	
End

This code adds a field, cube:Model, which we’ll use to store a Model-type entity (a 3D entity with a mesh and other related features).

The cube setup (in OnCreateWindow, after the scene and camera setup) consists of three lines:

  1. Local cube_box:Boxf = New Boxf (-0.5, -0.5, -0.5, 0.5, 0.5, 0.5)

    This creates a Box object (specifically of floating-point type, as denoted by the ‘f’), used to define a volume. The values define the far corners of the box — view these as two lots of three x, y, z values, each set of three defining an offset in space, so -0.5 in each direction, following by 0.5 in each direction, forming two corners into which the box will fit.

  2. Local cube_mat:PbrMaterial = New PbrMaterial (Color.White)

    This line creates a material that will be applied to the cube. (PBR refers to a form of realistic rendering that we won’t go into here.) The PbrMaterial New method can take a colour parameter, and we’re using one of mojo’s built-in Color-class definitions.

  3. cube = Model.CreateBox (cube_box, 1, 1, 1, cube_mat)

    And finally, the CreateBox helper method provided by the Model class takes the box we just set up, uses 1 for each of the x, y, z segment values (how many times the box is split along each axis) and the material to be applied.

Run the code and… nothing appears!

That’s because the camera and the cube occupy the same point in space; we can’t see anything because the inside faces of the cube (normally viewed from outside) are hidden by default.

Add another line after the CreateBox line:

cube.Move (0, 0, 5)

This moves the cube 5 units along the z-axis, into the screen.

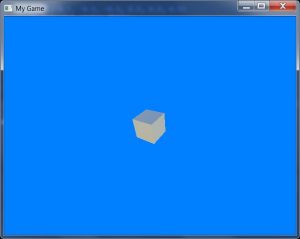
Run the code and the cube will appear.

Finally, for a bit of interest, add this line as the first line within OnRender:

cube.Rotate (1, 2, 4)

Run again and the cube will rotate, 1 degree around the x-axis per update, 2 around the y-axis and 4 around the z.

Experiment with the code — change the material colour to another defined in the Color class (see docs, but examples include Color.Red, Color.Lime, etc); also, change the speed of rotation, or set two axes to 0 to see the effect.

You can also change the size of the box definition to scale the cube.

Try moving the camera backwards instead of moving the cube forwards — hint: both Camera and Model are derived from the Entity class, which supplies the Move method. You’ll need to replace the reference to the cube with the reference to the camera, and supply a negative z-value in place of the 5 in order to move the camera back. (If you already know how to check for keypresses, try moving the camera back and forth in OnRender!)

You can download the source code for this tutorial at GitHub. This post is covered by the example, “2. Hello, Stuff.monkey2”.
Getting started with mojo3d: Creating a scene!

Thursday, February 14th, 2019

This is a quick introduction to getting started with mojo3d.

You can download the source code for this tutorial at GitHub; if you don’t know how to use git, just click the big green Clone or download button and select Download ZIP. (You’ll also find a second source file, intended to form part of the next tutorial, that I’ve included in error, but what the hey! It may allow you to move on sooner anyway!)

It assumes you are comfortable with at least the basics of object-oriented programming, working with classes, fields, methods, and the like, but no more than that.

Here’s a simple program that implements just about the minimum necessary for a basic mojo3d application:

#Import "<std>"
#Import "<mojo>"
#Import "<mojo3d>"

Using std..
Using mojo..
Using mojo3d..

Class MyGame Extends Window
	
	Field scene:Scene
	Field camera:Camera
	
	Method New  (title:String = "My Game", width:Int = 640, height:Int = 480, flags:WindowFlags = WindowFlags.Resizable)
		Super.New (title, width, height, flags)
	End
	
	Method OnCreateWindow () Override
		
		scene				= New Scene
		camera				= New Camera (Self)
		
	End
	
	Method OnRender (canvas:Canvas) Override
		
		If Keyboard.KeyHit (Key.Escape) Then App.Terminate ()
		
		RequestRender ()
		
		scene.Update ()
		camera.Render (canvas)
		
	End
	
End

Function Main ()

	New AppInstance
	New MyGame
	
	App.Run ()
	
End

Imports

We start with a few imports — the standard library, the mojo graphics library, and the mojo3d library that sits ‘on top’ of mojo.

You will always need to import these three classes at a minimum.

We also specify that we are Using them, in order to avoid the need to prefix all class names; for instance, we can now use Camera instead of mojo3d.Camera.

Main Window class

Next, we create a new class that Extends mojo’s Window class, allowing us to implement our own functionality, and add more as needed, which includes a few fields and three methods: New, OnCreateWindow and OnRender. (Note that MyGame can be called whatever you like, and contains all of the features of the Window class.)

There are two fields present here, scene (of mojo3d’s Scene type) and camera (of mojo3d’s Camera type). These will be the minimum needed in order to create a technically working 3D environment.

The New method simply creates the game window, via the Window.New method (called via Super to refer to the ‘parent’ New method).

OnCreateWindow overrides the parent Window method and implements our required functionality, in this case assigning a new Scene to the scene field, and a Camera to the camera field.

The Scene class organises and manages the entire 3D world, including all entities (3D objects of the Entity class, of which more later).

The Camera class is a built-in class providing visibility into the 3D world. Cameras are a type of Entity class, too, which allows us to move them around, rotate them, etc, like any other 3D object.

OnRender is the final built-in class here, and is where the action takes place.

Here, we check for the Escape key being hit, in which case the application terminates.

We ask the application to update its view via RequestRender — this is required.

We call scene.Update in order to update the scene; this has no effect in this case, but later on it will become relevant and I would suggest adding it anyway. (It will handle physics and collision updates, among other things.)

Finally, we use the camera to render to a canvas. Note that the canvas reference is passed in automatically by mojo (see the OnRender parameter). Rendering to this canvas will result in our 3D view appearing on screen.

Main

The remainder of the code is the standard, required, Main function: it creates a new Application instance, creates a MyGame instance (our overridden Window class) and then runs the application.

Behold!

Run the code, and… oh! It’s a blue screen…

This is fine — we haven’t placed any entities into the scene yet, but this blue is the default Scene screen-clearing colour. (You can modify this using scene.ClearColor = Color.Black, or any of the other built-in colours — to see these, use the Color documentation by placing the cursor inside Color and hitting the F1 key twice. You can of course create your own colours, but we’ll keep things simple for now.)

The blue screen in fact shows that our scene is rendering correctly.

Next time, we’ll add something to look at! (See the GitHub note at the very start if you want to toy with the second source file in the meantime.)