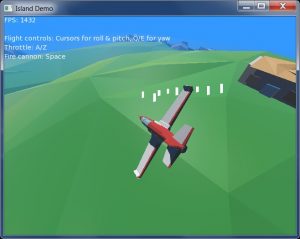
Following on from my last post, I am going to cover the final piece of the demo, the white self-deleting markers left by bullets striking the ground:
The source code zip file is in the previous post (scroll down a little), and remains unchanged. I just wanted to separate this out so you can see how useful it is to control non-physics entities too, in a really simple form.
WebGL Demo
Here’s the link to the web demo from that post — this new post relates to the little white markers left when bullets hit the scenery and how they simply remove themselves after a second:
As before, use Cursors to move, A & Z to speed up/slow down, plus Space to fire. Additionally, the plane now has yaw control, which is controlled via Q and E.
Behaviours, without physics
These ground markers are again defined as Behaviours, but this time without any physics elements — no rigid bodies or colliders this time!
As well as providing an easy way to attach physics to entities, Behaviours can also make management of non-physics entities really simple.
The only reference to this class is inside the BulletBehaviour’s Collided callback function, when the bullet is deleted from the scene. Just before it’s deleted, the bullet called MarkerBehaviour.Create, passing itself in as parent.
As covered in the previous post, this allows the new entity to automatically pick up the parent entity’s position and orientation, and we just need to remember to set its parent back to Null to ‘free’ it from the relationship.
In this case, that means a marker appears at the bullet’s final location and the Behaviour/component system handles the rest.
Note that there’s no other update or management code: the marker appears in the scene, then on each call to Scene.Update, its OnUpdate method is called.
Here, OnUpdate simply deletes the marker if it’s existed for more than one second. That’s it!
The rest of the code is the sprite creation, similar to the way bullets were set up — creating a global template sprite and simply copying it, the new copy picking up the parent bullet’s position and orientation, which will be where it collided with the ground. (The orientation is ignored, as sprites default to ‘billboard’ mode, remaining permanently upright. (You can modify this via Sprite.Mode and the SpriteMode enum options.)
Here’s the marker code in full:
Const MARKER_HEIGHT:Float = 10.0

Class MarkerBehaviour Extends Behaviour

	Global MarkerSprite:Sprite

	Field time_created:Int

	Function Create (parent:Entity)

		If Not MarkerSprite

			MarkerSprite			= New Sprite ()
			MarkerSprite.Visible	= False
			MarkerSprite.Scale		= New Vec3f (2.0, MARKER_HEIGHT, 1.0)

		Endif

		New MarkerBehaviour (MarkerSprite.Copy (parent))

	End

	Method New (sprite:Sprite)

		Super.New (Cast <Entity> (sprite))

		AddInstance ()

		sprite.Parent	= Null
		sprite.Visible	= True

		sprite.Move (0, MARKER_HEIGHT * 0.5, 0)

		time_created	= Millisecs ()

	End

	Method OnUpdate (elapsed:Float) Override

		If Millisecs () - time_created > 1000
			Entity.Destroy ()
		Endif

	End

End
One minor quirk: I was experimenting with passing in a Sprite instead of a plain Entity for the New method, hence there is a cast to Entity for the Super.New call. This wasn’t really necessary, but as with previous classes at least shows you can do things in different ways. Just pick what suits you and be more consistent than this!
Now you can place thousands of entities into your game scene and leave them to their own devices — no other management code or lists of entities needed!
Just remember to call Scene.Update in your OnRender method. (See island.monkey2, the main code file.)
Note on ‘missing’ markers in demo
You may notice that markers sometimes don’t appear, particularly on steep hills or sides of buildings.
My best guess is that they are simply buried inside the geometry, the collisions being detected part-way through the steep hillsides, etc, and the steeper the hillside, the less chance the marker will protrude through the ground. Setting the ground alpha to partly transparent shows all markers appearing, so I believe they’re simply inside. (A possible alternative explanation is that the island model geometry is a little messed-up; this can even be seen in normal demo use, with floating walls and cut-off slopes here and there, and the triangles do look a little odd, and possibly even flipped in places, when ground alpha is set to < 1.0.) I suppose it would be possible to manually calculate the correct vertical position using the mesh geometry and adjust the markers accordingly, but of course it's not overly-important for this demo!
